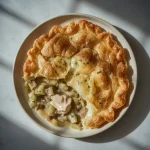
This Greek yogurt pizza dough is a clever shortcut that skips yeast entirely. You mix self-rising flour with plain yogurt and a few seasonings, then bake for half an hour. Joe Wicks developed this method for high-protein, quick weeknight meals that still taste like proper pizza.
The crust turns out tender with a crisp, golden exterior. It has a mild tang from the yogurt, but once you add sauce and toppings, nobody guesses it is not traditional dough. I make this on busy evenings when takeaway feels tempting, but I want something homemade and satisfying.

Gather These Fresh Ingredients for Joe Wicks Pizza Dough
Five ingredients form the base of this simple dough. Here is what you need and why each one matters.
Dry Base
- Self-rising flour, 1 3/4 cups — This already contains baking powder and salt, so you get lift without yeast. Keep extra flour on hand for dusting your work surface.
Dairy and Seasonings
- Plain Greek yogurt, 1 cup — Full-fat gives the best texture and richest flavour. The acidity in the yogurt activates the baking powder, creating steam that helps the dough rise.
- Fine sea salt, 1/2 teaspoon — Adds depth to the crust. Self-rising flour has some salt already, so this extra amount is just enough to enhance without overdoing it.
- Garlic powder, 1/2 teaspoon (optional) — A savoury touch that pairs beautifully with tomato sauce and cheese. Leave it out for a neutral base.
For Finishing
- Olive oil, 1 tablespoon — Brushed over the shaped dough before baking. This promotes even browning and keeps the crust crisp rather than dry.
Detailed Step-by-Step Instructions to Make Joe Wicks Pizza Dough
The process moves fast once the oven is hot. Follow these steps exactly and you will have perfect crusts every time.
- Preheat the oven and your baking surface — Set the oven to 425°F (218°C). Place a pizza stone or an inverted baking sheet on the middle rack while it heats. A hot surface underneath gives you a crisp bottom crust.
- Mix the dry ingredients — Whisk the self-rising flour, salt, and garlic powder together in a large bowl. This distributes the seasonings evenly before the wet ingredients go in.
- Add the yogurt — Dump the Greek yogurt into the flour mixture. Stir with a silicone spatula or your hands until a shaggy, crumbly dough forms. Do not be alarmed if it looks rough initially.
- Knead gently for 2-3 minutes — Turn the dough onto a lightly floured surface. Fold it over itself and press down softly. The dough should become smooth and supple, only slightly tacky to the touch. Over-kneading makes it tough.
- Adjust the texture if needed — If the dough sticks to your hands, sprinkle a little extra flour (1 tablespoon at a time) and knead it in. If it feels dry and crumbly, add a teaspoon of water. The final texture should be like soft play-dough — it holds together without cracking.
- Divide and rest — Cut the dough into 4 equal portions (about 130g each). Dust your hands with flour, roll each piece into a ball, cover with a clean towel, and let them rest for 5 minutes. This short rest relaxes the gluten, making the dough easier to stretch without springing back.
- Shape the crusts — Line a baking sheet with parchment paper. On a floured surface, press one dough ball into a disk, then roll or stretch it to an 8-inch circle about 1/4 inch thick. Transfer it to the parchment-lined sheet and repeat with the remaining balls.
- Dock and brush — Prick each pizza base all over with a fork (about 20-30 pierces per crust). This stops large bubbles from forming during baking. Brush each base lightly with olive oil.
- Bake until golden — Slide the parchment with the pizzas onto the preheated stone or baking sheet. Bake for 12-15 minutes, rotating the pan halfway through. The crust is done when it is golden brown and the bottom sounds hollow when tapped. For an extra-crisp bottom, remove the parchment for the last 3 minutes and bake directly on the stone.
- Cool and top as desired — Transfer the baked crusts to a wire rack for 2 minutes if you plan to add toppings later. For immediate pizza, add sauce, cheese, and toppings after the first 10 minutes of baking, then return to the oven for 3-5 more minutes until the cheese melts.
Common Mistakes and How I Fixed Them
I made a few of these errors myself when I first tried this dough. Here is what went wrong and how I solved it.
- Dough too sticky to handle — I added the yogurt all at once without adjusting for humidity. Now I add it gradually and stop when the dough comes together. A little extra flour fixed the stickiness.
- Over-kneading led to tough crust — The first time I kneaded for nearly 10 minutes because I thought longer was better. The crust came out dense and chewy. Two to three minutes of gentle folding is all this dough needs — the gluten develops fast.
- Skipping the rest period — I stretched the dough immediately after dividing it. It kept springing back and tearing. Letting the balls rest for 5 minutes relaxes the gluten, making rolling smooth and easy.
- Forgetting to dock the dough — One pizza puffed up like a balloon in the oven. Now I prick each base thoroughly with a fork (20-30 pierces). The crust stays flat and even.
- Underbaking the crust — I pulled the pizza out after 10 minutes because it looked set. The bottom was pale and soft. Twelve to fifteen minutes at 425°F gives you that golden, hollow-sounding base.
- Not preheating the baking surface — I put the dough on a cold sheet pan once. The bottom stayed doughy while the top browned. Preheating the stone or inverted tray makes all the difference for a crisp finish.
What Pairs Perfectly with Joe Wicks Pizza Dough
This crust works with nearly any topping combination. Here are some pairings I return to again and again.
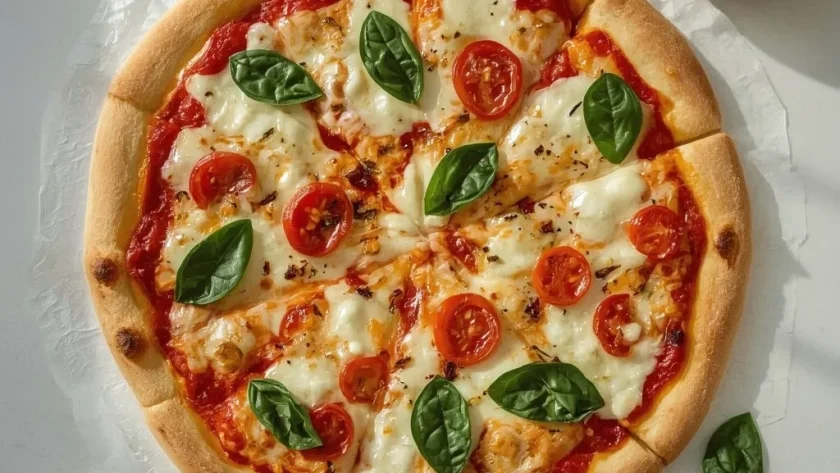
- Classic Margherita — Tomato sauce, fresh mozzarella, and basil leaves. The simple flavours let the crust shine, and the yogurt tang complements the acidity of the tomatoes.
- Spicy sausage and peppers — Crumbled Italian sausage, sliced bell peppers, and red pepper flakes. The savoury-garlic crust holds up well against bold, spicy fillings.
- Roasted vegetable medley — Thinly sliced zucchini, cherry tomatoes, and red onion tossed in olive oil and roasted first. The sweetness of the vegetables balances the tangy dough.
- Pesto and chicken — Spread basil pesto instead of tomato sauce, then add shredded cooked chicken and grated Parmesan. The garlic in the crust echoes the pesto notes beautifully.
- Mushroom and truffle oil — Sautéed cremini mushrooms with a drizzle of truffle oil after baking. Earthy flavours pair wonderfully with the subtle tang of the yogurt dough.
- Simple cheese and herb — Just shredded mozzarella, a sprinkle of dried oregano, and a pinch of flaky sea salt. Sometimes the simplest version is the most satisfying, and it lets you taste the crust itself.
Pro Tips for Making Joe Wicks Pizza Dough
A few small tweaks make a big difference. These tips will help you get consistent results every time.
- Use full-fat Greek yogurt — Low-fat or non-fat yogurts contain more water, which makes the dough stickier and the final crust less tender. Full-fat gives the best texture and flavour.
- Weigh your flour for accuracy — Scooping flour with a cup can pack it down, giving you too much. Spoon it lightly into the cup and level it off, or use a kitchen scale for the most reliable results.
- Rest the dough after shaping — Those 5 minutes are non-negotiable. The gluten relaxes enough that the dough stretches easily without snapping back into a tight ball.
- Parchment paper is your friend — It makes transferring the delicate crusts to the hot stone simple. You can also slide the whole sheet onto the preheated surface without sticking.
- Check the bottom before topping — Bake the crust alone for the full time if you plan to add toppings later. If you top it first, add the toppings after 10 minutes of baking for a fully cooked base.
- Adjust bake time based on thickness — Thinner crusts (1/8 inch) need about 10-12 minutes. Thicker ones (1/4 inch) take the full 15. Watch for that golden colour and hollow sound.
- Don’t skip the oil brush — Olive oil brushed on before baking helps the crust brown evenly and stay crisp. Without it, the top can turn dry and pale.
Inspiring Variations of Joe Wicks Pizza Dough
This recipe adapts easily to different diets and tastes. Try these variations when you want something new.
- Whole wheat version — Replace half the self-rising flour (about 3/4 cup) with whole wheat self-rising flour. The crust becomes nuttier and slightly denser, but still tender.
- Gluten-free option — Use a gluten-free self-rising flour blend. Add an extra tablespoon of yogurt or water if the dough feels too dry, as gluten-free flours absorb more moisture.
- Herb-infused crust — Stir 1 teaspoon of dried oregano, rosemary, or thyme into the dry ingredients. The herbs perfume the entire crust and pair beautifully with tomato-based sauces.
- Cheese-stuffed crust — After rolling each circle, place thin mozzarella sticks around the edge, fold the dough over, and seal. Brush with oil and bake as directed for a gooey surprise in every bite.
- Spicy chili crust — Add 1/2 teaspoon of red pepper flakes or a pinch of cayenne pepper to the flour mixture. The heat lingers subtly and works well with spicy sausage or pepperoni toppings.
- Everything bagel crust — Sprinkle the shaped dough with sesame seeds, poppy seeds, dried garlic, and dried onion flakes before baking. This turns the crust into a savoury, crunchy base that tastes great with cream cheese and smoked salmon as an open-faced snack.
How to Store Joe Wicks Pizza Dough Properly
Extra baked crusts store well if you handle them correctly. Here is how I keep mine fresh.
- Room temperature storage — Place cooled, un-topped crusts in an airtight container or wrap them tightly in foil. Keep them at room temperature for up to 2 days. Layer parchment between crusts to prevent sticking.
- Refrigerator method — Wrap each crust individually in plastic wrap, then place them in a zip-top bag. They stay fresh for up to 5 days. The airtight barrier prevents them from drying out.
- Freezing for long-term — Wrap each cooled crust tightly in plastic wrap, then again in aluminum foil. Store them in a freezer-safe bag for up to 3 months. Squeeze out as much air as possible before sealing.
- Unbaked dough balls — Shape the dough into balls after the rest period, wrap each one in plastic wrap, and refrigerate for up to 2 days. Let them sit at room temperature for 10 minutes before rolling to make stretching easier.
Smart Reheating Tips for Joe Wicks Pizza Dough
Reheating frozen or refrigerated crusts properly restores their crispness. Skip the microwave and use one of these methods instead.
- Oven method — Preheat the oven to 425°F (218°C). Place the crust directly on the rack and bake for 5-7 minutes. This revives the golden exterior and keeps the inside tender.
- Skillet method — Heat a dry skillet over medium heat. Add the crust and cook for 2-3 minutes per side. The direct heat crisps the bottom perfectly without drying it out.
- Air fryer method — Set the air fryer to 350°F (177°C). Place the crust in the basket and warm for 3-4 minutes. Flip halfway through for even heating.
- Avoid the microwave — Microwaving turns the crust rubbery and soft. If you are in a rush, use the skillet method instead — it takes only slightly longer but gives vastly better results.
FAQs
Can I freeze Joe Wicks Pizza Dough?
Yes. Baked, un-topped crusts freeze beautifully for up to 3 months. Wrap each one in plastic wrap and then foil, squeezing out as much air as possible. Thaw at room temperature for about 30 minutes before reheating.
Does this dough need yeast?
No. The self-rising flour and Greek yogurt work together to create lift. The acid in the yogurt activates the baking powder, producing carbon dioxide bubbles that make the dough rise — no yeast required.
How long does Joe Wicks’ Pizza Dough last in the fridge?
Baked crusts last up to 5 days in the refrigerator. Wrap them tightly in plastic wrap or store them in an airtight container. Unbaked dough balls keep for 2 days refrigerated, but let them sit at room temperature for 10 minutes before rolling.
Can I use non-fat Greek yogurt?
You can, but the crust will be slightly less tender and more prone to sticking. Full-fat yogurt contains less water and more fat, which gives a softer, more pliable dough. If you use non-fat, add an extra tablespoon of flour if the dough feels sticky.
Why is my dough cracking when I roll it?
Your dough may be too dry. Add a teaspoon of water and knead it in gently. Also, make sure you rested the dough balls for the full 5 minutes — this relaxes the gluten and prevents cracking.
Can I make this dough ahead of time?
Yes. Prepare the dough, shape it into balls, and refrigerate for up to 2 days. Let the balls sit at room temperature for 10 minutes before rolling. You can also bake the crusts fully and reheat them later using the oven or skillet method.
Nutritional Value
Based on 1 serving = 1 out of 4 crusts (un-topped).
- Calories: 287
- Protein: about 15g
- Fat: around 4.5g
- Carbohydrates: about 45g
- Fiber: roughly 1.5g
- Sugar: around 2g
- Sodium: 420mg
Wrapping Up
This Joe Wicks Pizza Dough has become my go-to for quick homemade pizzas. It comes together in under 30 minutes, requires no special equipment, and delivers a crisp, tender crust every time. I hope you give it a try and see how easy weeknight pizza can be.
Try These Recipes
- Ina Garten Peach Cobbler
- Paul Hollywood Wholemeal Bread
- Joe Wicks Beef Stir Fry
- Joe Wicks Beef Stroganoff
Joe Wicks Pizza Dough

This high-protein pizza dough uses Greek yogurt and self-rising flour to create a tender, pliable crust with a crisp golden exterior. Ready in under 30 minutes, it’s a game-changer for quick weeknight pizzas that satisfy cravings without the wait.
- Prep Time: 10
- Cook Time: 15
- Total Time: 25
- Yield: 4 1x
- Category: Main Course
- Method: Baking
- Cuisine: Italian
Ingredients
- 1 3/4 cups self-rising flour, plus extra for dusting
- 1 cup plain Greek yogurt (full-fat preferred for best texture)
- 1/2 teaspoon fine sea salt
- 1/2 teaspoon garlic powder (optional, for savory flavor)
- 1 tablespoon olive oil, for brushing
Instructions
- Preheat your oven to 425°F (218°C). Place a pizza stone or inverted baking sheet on the middle rack to preheat as well — this ensures a crisp bottom crust. If you don’t have a stone, a regular sheet pan works but may yield a slightly softer base.
- In a large mixing bowl, whisk together the 1 3/4 cups self-rising flour, 1/2 teaspoon fine sea salt, and 1/2 teaspoon garlic powder (if using). Self-rising flour already contains baking powder and salt, so the extra salt enhances flavor without over-leavening.
- Add the 1 cup of full-fat Greek yogurt to the dry ingredients. Using a silicone spatula or your hands, mix until a shaggy, crumbly dough forms. The yogurt provides protein and moisture while the acidity activates the baking powder, creating lift without yeast.
- Turn the dough out onto a lightly floured work surface. Knead gently for 2-3 minutes, folding the dough over itself and pressing it down. Do not over-knead — gluten develops quickly in this dough, and excess gluten will make it tough. The dough should be smooth, supple, and only slightly tacky, not sticky.
- If the dough feels too sticky, sprinkle with a little extra flour (1 tablespoon at a time) and knead it in. If too dry, add a teaspoon of water. The ideal texture is like soft play dough — it should hold together without cracking.
- Divide the dough into 4 equal portions (about 130g each). Lightly dust your hands with flour and roll each piece into a ball. Cover with a clean kitchen towel and let rest for 5 minutes. This short rest relaxes the gluten strands, making the dough easier to stretch without springing back.
- Line a second baking sheet with parchment paper. On a lightly floured surface, press one dough ball into a disk, then use a rolling pin or your hands to roll or stretch it into a 8-inch circle about 1/4 inch thick. Transfer the circle to the parchment-lined sheet. Repeat with remaining balls.
- Using a fork, dock the dough by pricking it all over (about 20-30 pierces per pizza). This prevents large bubbles from forming during baking, giving you an even, flat crust. Brush each pizza base lightly with olive oil — this promotes browning and helps the crust stay crisp.
- Carefully slide the parchment with the pizzas onto the preheated stone or inverted baking sheet (or place the sheet pan directly onto the rack). Bake for 12-15 minutes, rotating the pan halfway through, until the crust is golden brown and the bottom sounds hollow when tapped. For a crisper bottom, bake directly on the stone without parchment for the last 3 minutes.
- Remove from the oven and let cool on a wire rack for 2 minutes before adding toppings (if making fully baked crusts). For immediate pizza, add your toppings after the first 10 minutes of baking, then return to the oven for 3-5 more minutes until cheese melts and toppings are hot. The crust is now ready for any combination of sauce, cheese, and toppings.
Notes
Storage: Baked, un-topped crusts keep in an airtight container at room temperature for up to 2 days, or refrigerated for up to 5 days. Freezing: Wrap each cooled crust tightly in plastic wrap, then foil; freeze for up to 3 months. Reheating: For best texture, reheat in a preheated 425°F (218°C) oven directly on the rack for 5-7 minutes. Alternatively, reheat in a dry skillet over medium heat for 2-3 minutes per side. Avoid microwaving, which will make the crust rubbery.
Nutrition
- Calories: 287
- Sugar: 2g
- Sodium: 420mg
- Saturated Fat: 0.5g
- Trans Fat: 4.5g
- Carbohydrates: 45g
- Fiber: 1.5g
- Protein: 15g
- Cholesterol: 5mg
Keywords: Joe Wicks pizza dough, healthy pizza dough, high-protein pizza, Greek yogurt pizza dough, self-rising flour pizza, quick pizza dough, easy pizza recipe, weeknight pizza, homemade pizza, no-yeast pizza dough, 25-minute pizza dough